

It is also easy to learn How to Grow Microgreens, and it is rewarding and suitable to both among beginners and experienced gardeners. These are fast growing greens, full of nutrients, and are typically ready to eat in two weeks, and are rich in vitamins, minerals, and antioxidants. Their bright color and new taste render them an outstanding choice of healthy food and cooking.
The most effective aspect of How to Grow Microgreens is that it does not need much space and materials. They can be cultivated either in small trays or containers both indoors and outdoors hence they are suitable in apartments and homes. Microgreens are fresh and organic, and all that it takes is the right light, water and good seeds to have them throughout the year.
Understanding Microgreens
Microgreens are young, edible plants harvested at an early stage of growth, typically 1 to 3 weeks after germination. Known for their bold flavors, vibrant colors, and impressive nutritional value, microgreens have become a favorite among chefs, health-conscious individuals, and home gardeners. Unlike sprouts, which are eaten whole including the roots, microgreens are harvested by cutting the stem just above the soil or growing medium, leaving the roots behind. This growing method results in cleaner, fresher greens that are easy to use in everyday meals.
Benefits of Growing Microgreens
1. Nutrient-Dense Superfood
Microgreens are considered a powerhouse of nutrition. Research shows they can contain up to 40 times more vitamins and minerals than mature vegetables. They are rich in Vitamin C for immune support, Vitamin K for bone health, and antioxidants that help fight inflammation and oxidative stress. In addition, essential minerals like iron, zinc, and magnesium support overall health and energy levels.
2. Easy and Fast to Grow
One of the biggest advantages of microgreens is how quick and easy they are to grow. Most varieties are ready to harvest within 7 to 14 days, making them perfect for beginners. With minimal care and basic supplies, you can grow fresh greens on a kitchen counter, windowsill, or balcony.
3. No Large Garden Required
Microgreens thrive in small containers or shallow trays, so you don’t need a backyard or outdoor space. This makes them ideal for urban homes and apartments, allowing anyone to enjoy fresh, homegrown produce regardless of space limitations.
4. Cost-Effective and Sustainable
Growing microgreens at home is a budget-friendly and eco-conscious choice. Store-bought organic microgreens can be costly, but home growing requires only seeds, soil or growing medium, water, and light. It also reduces packaging waste and promotes a more sustainable, self-sufficient lifestyle.
2. Easy and Quick to Grow
Unlike traditional gardening, growing microgreens requires minimal time and effort. Most varieties are ready to harvest within 7 to 14 days. You don’t need a large garden just a small space on your kitchen counter, balcony, or windowsill.
3. No Need for a Large Garden
Since microgreens can be grown in small containers or shallow trays, you don’t need access to an outdoor garden. This makes them an excellent choice for people living in cities or homes without backyard space.
4. Cost-Effective and Sustainable
Buying organic microgreens from stores can be expensive, but growing them at home costs just a fraction of the price. You only need seeds, soil (or a growing medium), water, and light to get started. Plus, growing your own microgreens reduces your reliance on store-bought produce and cuts down on packaging waste.
Choosing the Right Seeds for Microgreens
Selecting the right seeds is a crucial step in how to grow microgreens successfully. Always choose organic, untreated, and non-GMO seeds to ensure they are safe for consumption. Seeds specifically labeled for microgreens or sprouting are ideal, as regular garden seeds may be treated with chemicals.
Some of the best seeds for growing microgreens include:
-
Brassica family: Broccoli, kale, cabbage, mustard
-
Herbs: Basil, cilantro, parsley, dill
-
Legumes: Peas, lentils, chickpeas
-
Other greens: Sunflower, beet, amaranth, radish
These varieties grow quickly, deliver excellent flavor, and provide high nutritional value.
Selecting the Right Growing Medium
Microgreens can be grown using soil, coconut coir, or hydroponic mats, each offering unique benefits.
-
Soil: Rich in natural nutrients and supports strong root development, making it perfect for beginners.
-
Coconut coir: A sustainable, lightweight option that holds moisture well and promotes healthy growth.
-
Hydroponic mats: Clean and easy to manage, though they may require added nutrients for optimal results.
For best results, use a lightweight, well-draining organic potting mix free from artificial fertilizers.
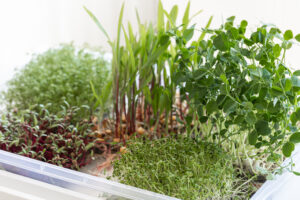
Setting Up Your Microgreens Growing Area
Microgreens grow well in shallow trays, seedling flats, or small containers. Choose a location with good airflow to reduce the risk of mold. If growing indoors, place trays near a south-facing window or use LED grow lights when natural light is limited.
Equipment Needed:
-
Shallow trays or containers
-
Organic soil or hydroponic growing medium
-
Spray bottle for gentle watering
-
LED grow lights (if needed)
-
Sharp scissors for clean harvesting
With the right seeds, growing medium, and setup, you’ll be well on your way to mastering how to grow microgreens at home easily and efficiently.
Planting Microgreens Step-by-Step
Learning how to grow microgreens is simple when you follow the right planting process. With minimal space and basic tools, you can enjoy fresh, nutrient-rich greens at home or scale up for commercial production.
Preparing the Growing Tray
Start by filling a shallow tray with 1–2 inches of soil or your preferred growing medium. Gently level the surface without pressing it down too firmly, allowing the roots to grow freely and establish strong support.
Sowing the Seeds
Spread the seeds evenly across the surface, avoiding overcrowding to ensure healthy growth. Lightly press the seeds into the soil, but do not bury them deeply. Larger seeds like peas and sunflower benefit from pre-soaking, which helps improve germination rates.
Watering the Seeds
Use a spray bottle to mist the soil gently. The goal is to keep the growing medium moist without making it soggy. Heavy watering can displace seeds and slow down germination.
Providing the Right Environment
Cover the tray with a lid or another shallow tray for the first few days to create a dark, humid environment. This encourages faster germination and helps seedlings develop strong roots.
Light and Ventilation
Once sprouts appear usually within 3–5 days remove the cover and introduce light. Place trays near a window or under LED grow lights for 12–16 hours daily. Proper ventilation is essential to prevent mold and fungal growth.
Regular Watering
Mist your microgreens daily to keep the soil evenly moist. Avoid overwatering, as excess moisture can lead to mold and root issues.
Harvesting Microgreens
Microgreens are typically ready for harvest within 10–14 days, depending on the variety. Harvest when the first true leaves appear. Use clean, sharp scissors to cut the greens just above the soil level.
Storage Tips for Fresh Microgreens
For the best taste and nutritional value, microgreens should be consumed fresh. Store harvested greens in an airtight container lined with a paper towel to absorb excess moisture. Keep them refrigerated and use within 5–7 days for optimal freshness.
- Use them fresh for maximum flavor and nutrients.
- Store in an airtight container lined with a paper towel to absorb excess moisture.
- Keep in the refrigerator for up to a week.
Scaling Up: Microgreens Business
When you’re ready to grow beyond your home setup, it’s important to understand how to grow microgreens on a larger scale. Focusing on high-demand varieties such as broccoli, radish, and pea shoots can help ensure consistent sales. Investing in high-quality LED grow lights allows for reliable, year-round production, regardless of weather conditions. To stand out in the market, adopt sustainable practices by using eco-friendly, biodegradable packaging, which appeals to environmentally conscious consumers. Building strong relationships with restaurants, health stores, and local customers through social media and farmers’ markets can further support business growth. With the right approach, Greenu Microgreens represents a smart and scalable opportunity in the healthy food market.
Whether you want to enjoy fresh greens at home or launch a profitable venture, learning how to cultivate microgreens opens the door to both health and entrepreneurship.
Conclusion
Growing your own microgreens is a simple yet powerful way to add fresh, nutrient-rich greens to your daily lifestyle. With their rapid growth, minimal space requirements, and exceptional nutritional value, microgreens are ideal for homes of all sizes from apartments to large houses. They are easy to grow and deliver impressive health benefits in a short time.
By understanding how to grow microgreens from selecting the right varieties and providing proper lighting to harvesting at the right stage you can enjoy a steady supply of fresh, flavorful greens all year long. Whether for personal wellness or as a small business opportunity, Greenu Microgreens offers a sustainable, affordable, and rewarding way to grow healthy food. Start today and experience the benefits of these powerful superfoods.
Explore related articles : https://www.greenu.in/how-to-grow-microgreens-easily-at-home-step-by-step/